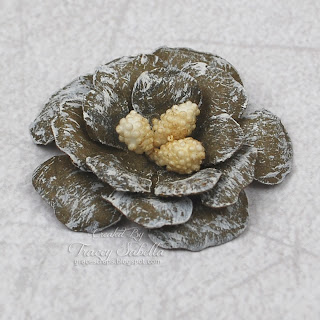
Hi, this is Tracey S. with you today. I have a tutorial for my Sweet Open Rose to share with you.
One of the things I enjoy incorporating into my scrapbook pages is flowers, especially handcrafted flowers. When I don't have just the right color or size flower in my stash, I can create what I need. I created all of the flowers in my ScrapThat! Carolina Snow page including this Sweet Open Rose.
Sweet Open Rose Tutorial
Please note - while this looks like a lot of steps, I separated out each possible step for followers that may be less experienced at creating flowers. These little gems are quite easy and go quickly once you have made a few.
Supplies:
1. Die Cut Machine (Big Shot)
2. Donna Salazar ~ Spellbinders Rose Creation Dies - 3 smallest dies
3. Paper Scrap (Powder Mountain)
4. Distress Ink (Brushed Corduroy, Frayed Burlap) (Optional)
5. Foam Ink Applicator (Optional)
6. Craft Mat (Optional)
7. Paper Scrap (Powder Mountain)
8. Foam Mat
9. Stylus (optional)
10. Round Nose Pliers (Optional)
11. Glue
12. Stamen
13. Gesso, White Paint, or White Ink
14. Paint Brush
Step 1. Use die cut machine to cut 1 each of three smallest Rose Creations petals. For this project I used a scrap of grey from the center of the Powder Mountain page from the ScrapThat! January Kit.
Step 2. Ink petals. For this project I first applied Brushed Corduroy, then I applied to just the edges the darker Frayed Burlap. You can use any color of ink or skip the inking altogether. If you don't have the Ranger applicator any kind of foam applicator will work.
Step 3. Place the petals on a foam mat and using a stylus or other rounded object use a circular motion to form a cup in each petal. Any kind of foam mat will work - even the foam packaging that brads are tucked into. If you don't have a medium size stylus, try the back end of a large paint brush, or capped pen - anything that is rounded and smooth.
Step 4. Shape the petals by grasping the side of each petal and rolling back with round nose pliers. If you don't have round nose pliers (in the jewelry department), you can roll the petals around something like the end of a paint brush or even a toothpick. The pliers do make quicker work of this step, however.
Step 5. Glue the petals together with the largest on the bottom working up to the smallest. Be sure that the petals you are laying on top are arranged so that they fit between the petal of the layer below for a more natural appearance. Also be sure that your holes line up so you will have a spot to add your stamens.
Step 6. Place your blossom on your foam mat and press into the center.
Step 7. Use the round nose pliers to curl down the wide outer edge of each petal - just a little. Again, another rod like a paintbrush or toothpick will work.
Step 8. Ink the Stamens. This step is optional depending on the look you want. I used the ink left on my applicator to tone down the bright white. These are the stamens included in the January ScrapThat! Kit. I left one white in the photo to show the difference.
Step 9. Pull the cords of the stamens through the center hole. Pull them to one side on the back and glue down, trimming away the extra length of cording.
Step 10. Dry Brush Gesso onto the petals for a snowy look. To dry brush, put a drop of gesso onto a craft mat (paint pallet, foil, plastic lid . . .) Dip your brush into the gesso and brush most of it off. Then start applying the gesso to the flower for a light snowy appearance. If you don't have gesso, you can use white paint, or even the white ink included in the ScrapThat! January kit. While the ink will have a different look, it will still soften the brown.
I hope you've enjoyed this tutorial and will give it a try. There are a lot of variations you can make once you have mastered the basics of this technique by changing colors, petal sizes and even adding additional petals. You can also change the center with a pearl, gem, brad, flower bud, microbeads, - the sky is the limit.
Once again here is a close-up of my project flower:
I can't wait to see the flowers you create. Be sure to share them in our ScrapThat! Gallery.


This is a beautiful rose, Tracey! Thanks for sharing this wonderful technique!
ReplyDeletegorgeous antique rose! thanks for the tutorial!
ReplyDelete